Packet Squirrel Basics
Packets go in. Packets go out. What happens in between is up to you.
Of the three built-in payloads (tcpdump, dns spoof, openVPN) only the later two need to be configured. This can be done via SSH or SCP (Windows users check out puTTY and winSCP).
To get into the device flip the switch to arming mode (far right position), plug an Ethernet cable from your computer into the Ethernet In port (left side, above the micro USB port), and power on the Packet Squirrel with any ordinary Micro USB cable and USB power supply (phone charger, computer’s USB port, battery bank). It takes 30-40 seconds to boot, indicated by a blinking green LED. Once it’s booted it’ll be in arming mode, indicated by a blinking blue LED.
From here your computer will receive an IP address from the Packet Squirrel in the 172.16.32.x range, and you’ll be able to ssh in as root to 172.16.32.1. The default password is hak5squirrel
You’ll find the default payloads from /root/payloads in their corresponding switch folders.
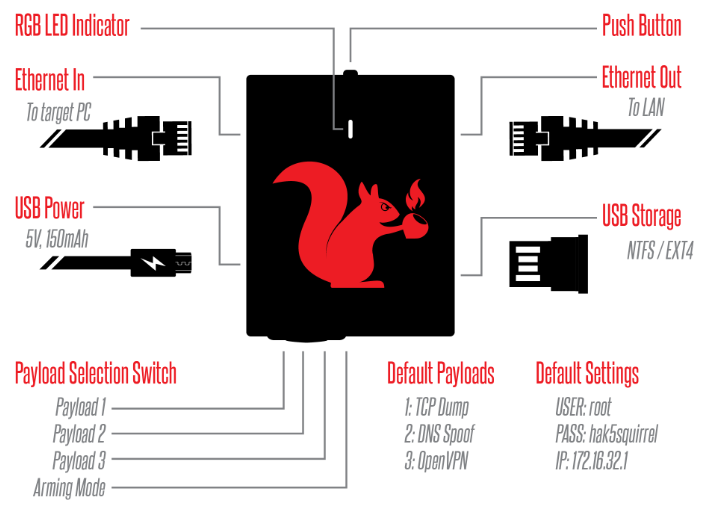
RGB LED Indicator
This status LED will light to indicate various states such as boot-up, errors and payload execution.
Push Button
The push button may be used by various payloads to perform functions using the BUTTON command. The push button has two default actions.
Arming Mode
In Switch Position 4 (closest to the USB host port) the Packet Squirrel will boot into arming mode, enabling SSH access. From this dedicated mode, Packet Squirrel payloads may be managed via SCP or the Linux shell. This mode is indicated by a slow blinking blue LED.